Beginner Classic Eyelash Extension Course
About Course
Are you ready to begin your journey into the world of eyelash extensions? Our Beginner Classic Eyelash Extension Course is designed for those who are new to the beauty industry or looking to expand their skill set. This comprehensive course will teach you the essential techniques to apply classic eyelash extensions safely, professionally, and with stunning results.
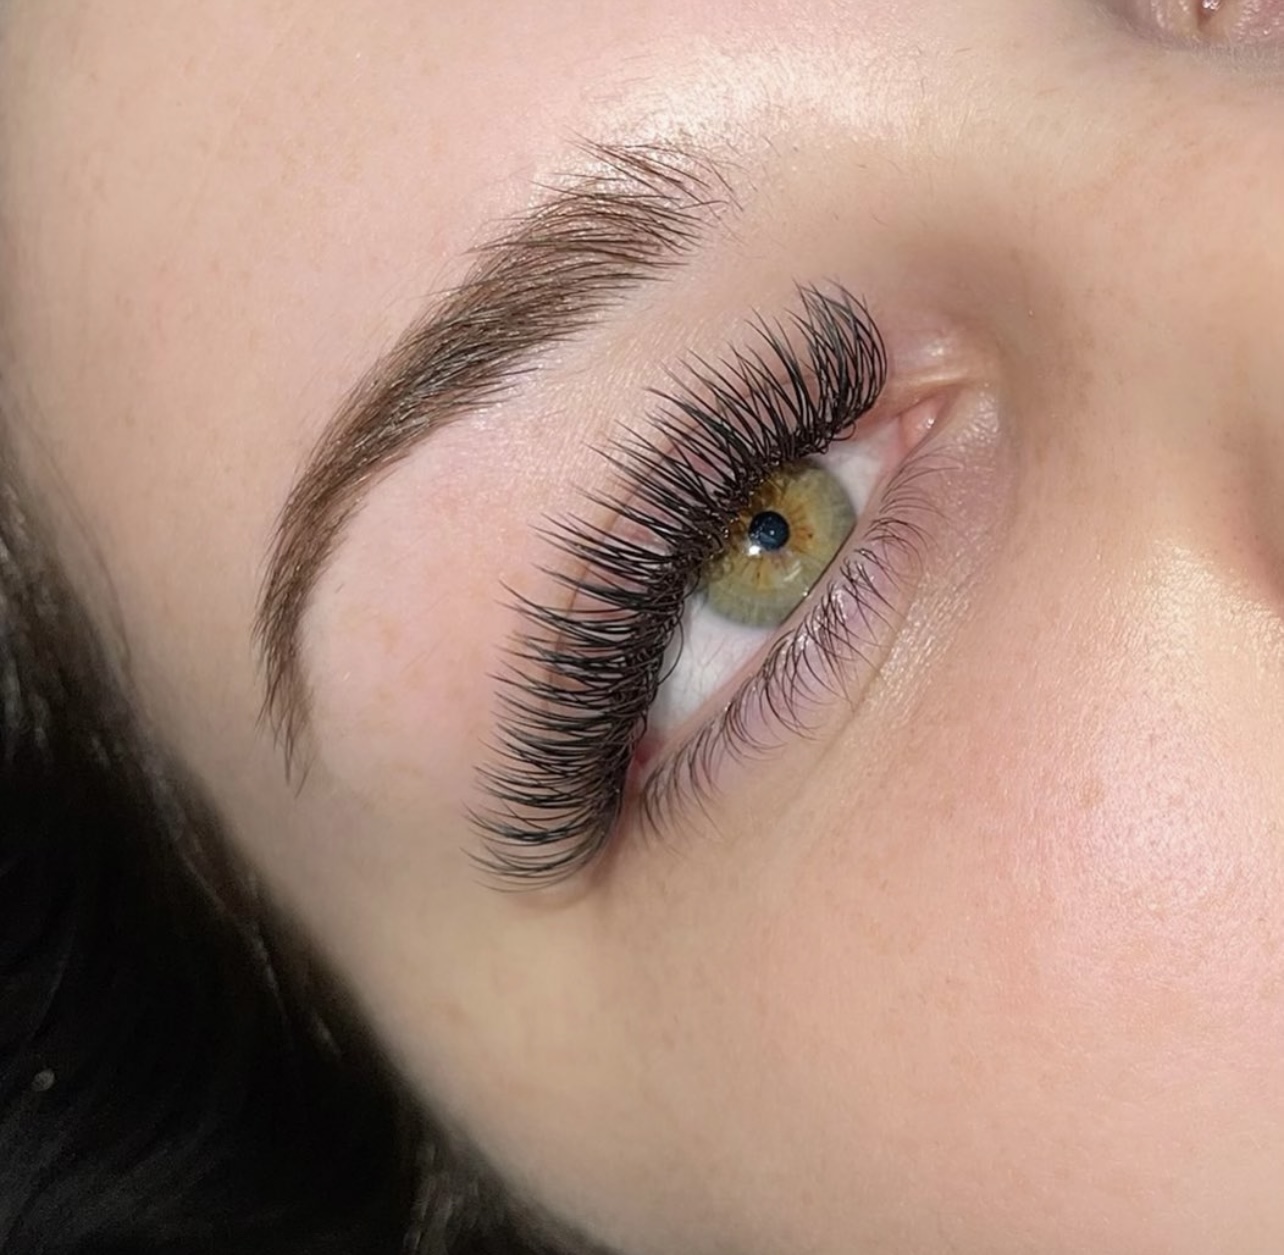
In this course, you will learn the art of applying one extension to each natural lash, creating a beautiful, natural look that enhances your clients’ eyes. We’ll guide you through everything from preparation and application to aftercare, ensuring you feel confident and competent in performing this popular treatment.
What you’ll learn:
- The Basics of Eyelash Extensions: Understanding lash types, materials, and the different curl, length, and thickness options.
- Lash Health and Safety: Learn how to assess natural lashes and apply extensions safely, ensuring your clients’ lash health is preserved.
- Classic Lash Application: Master the step-by-step process of applying one extension per natural lash to create a natural, elegant look.
- Tools & Products: Familiarise yourself with the essential tools, adhesives, and products used for classic lash applications.
- Lash Mapping & Design: Learn how to customise lash styles to suit various eye shapes, creating the perfect look for each client.
- Client Consultation & Aftercare: Discover how to effectively communicate with clients about their desired look and provide aftercare instructions to ensure long-lasting results.
Who is this course for?
- Beginners with no prior experience in eyelash extensions
- Beauty professionals looking to add eyelash extensions to their service menu
- Anyone passionate about learning a new skill in the beauty industry
By the end of the course, you will be able to perform classic eyelash extensions confidently and professionally, providing your clients with beautiful, natural-looking lashes that last for weeks.
What Will You Learn?
- Introduction to Eyelash Extensions: Understand the different types of lash extensions (classic, volume, hybrid) and their benefits.
- Lash Health & Safety: Learn how to assess natural lash health and apply extensions safely to protect your clients’ lashes.
- Classic Lash Application: Master the technique of applying one extension per natural lash to create a natural, elegant look.
- Tools & Products: Get familiar with the essential tools, adhesives, and products used in eyelash extension application.
- Lash Mapping & Design: Learn how to map lashes and design custom styles for different eye shapes and desired looks.
- Client Consultation: Develop effective communication skills to understand your client’s needs and create their perfect lash style.
- Aftercare & Maintenance: Provide clients with proper aftercare instructions to ensure the longevity and health of their lashes.
- Hands-on Practice: Gain practical experience with live models to perfect your technique and boost your confidence.
- Certification: Receive a certificate upon completion to show your proficiency in classic eyelash extension applications.
Course Content
Welcome to INX Training Academy!
This is your course manual and we will cover everything you need to know!
Introduction
Eyelash extensions have become so popular over the past few years. If your clients are looking for something more permanent than mascara or more dramatic than a lash lift, eyelash extensions are the perfect alternative.
Eyelash extensions are semi-permanent synthetic, faux mink or silk fibres applied individually to your natural eyelashes. The eyelash extensions are carefully applied using a semi- permanent glue that will not damage the natural lashes if applied correctly and clients follow the correct aftercare. Lash extensions are applied directly to the natural lash unlike false strip lashes that are applied to the skin. With this technique you can get a much more natural and seamless finished look. The final look can be as natural or as dramatic as the client wants, to some extent. For instance, if your client has damaged lashes or naturally weak and short
lashes, it is not always possible to get a more dramatic, full look.
You’re here to give the best service and treatments you can! This includes looking after your clients as well as meeting their needs to the best of your ability.
Beauty therapist expectations
Within the beauty industry, image and appearance is very important. First impressions are everything after all! Clients will associate your level or professionalism and competence with their first impression of you.
Uniform – A clean tunic/uniform should be worn at all times; a clean overall daily prevents cross infections.
Hair – Make sure your hair is out of your face and presented well. This shows you are well groomed, as well as keeping it out of your face to take away any distractions.
Shoes – Therapists should avoid open-toed shoes or sandals as this style of shoe offers little protection of the feet in the event of a spillage of hot or potentially hazardous substances.
Jewellery – Keep jewellery to a minimum and avoid dangling earrings or bracelets. Products can also collect under the jewellery causing skin irritation and increasing the chances of cross infections. Jewellery can also scratch or mark clients so bare this in mind.
Nails – Short, well-manicured nails enable treatments to be performed more effectively and
hygienically. Make sure any cuts or abrasions on hands are covered with surgical dressing to avoid cross infection. Make sure you wash your hands or hand sanitise before and after every client.
Personal Hygiene – Ensure oral and bodily cleanliness and avoid over-powering perfume. Prior to treatments, try and avoid spicy food or smoking as these smells may be offensive to the client. Wear a mask when carrying out treatments.
Consultations and Client Forms
Before any treatment is undertaken, it is essential that a consultation is carried out. The consultation period provides a good opportunity for the therapist to get to know the client and to discuss expectations and requirements with regard to the proposed treatment.
The therapist should use this time to relax the client and gain their confidence; many clients are nervous when they first visit a new therapist. It is important to encourage and allow time for clients to ask questions so the client does not feel rushed or under pressure, otherwise the therapist may not receive all the facts from the client.
The consultation stage is important for the development of client-therapist relations but it also allows you to gain vital information relevant to the treatment. You should ask the client to declare any current or present health problems and medical conditions, even if they seem irrelevant to the client, a previous operation or latent medical condition may influence the treatment you will deliver.
It is important for a therapist to identify any potential or known contraindications to treatments so cross infection can be prevented and the treatment can be modified if necessary. Some contraindications may be made worse by treatment and the client should in some cases be recommended to seek medical advice. At this point, you will be able to judge which treatments are and are not suitable for the client to receive.
Consultation forms should be filed with a completed client record card so that you can maintain and update information relevant to the client and her treatment plan. Client records ensure continuity of service, especially for regular clients and ensure that the salon and all staff are aware of any pertinent medical conditions the client may suffer from.
It is essential to make a record of a client’s responses to questions asked during the consultation. A record of contraindications and sensitivities should also be made.
It is important for the salon to complete client records for the following: • Legal reasons – e.g., to prove the client has had the treatment
• As proof the client has had a consultation
• To provide reference for future treatments/services
• To allow the therapist to monitor progress • In case of an insurance claim
• Complies with data protection
• It is a duty of care
The client record should include the following information:
• Name
• Home address
• E-mail address
• Telephone number
• Relevant medical information
• Emergency/next of kin contact details
• A record of dates and treatments completed
• Results achieved by the treatments
You should maintain and update all information on the client record card so that you and your colleagues can continue to offer a safe treatment with suitable products and equipment. The record cards also allow you to keep track of your client’s progress, which can be a good boost to her confidence. Having a record of the client’s address is also useful when there are any special events at the salon such as demonstrations and open nights; the client record cards also mean that you are able to inform her of any special offers and promotions which might be of interest.
The client record cards should be stored alongside initial consultation forms and all cards should be filed alphabetically. It is important to ensure the security of all confidential information given to you by the client; all record cards should be stored in a lockable filing cabinet in reception.
All information from your clients should be filed away securely, you are required to comply with the Data Protection Act 1984, An act to make provision for the regulation of the processing of information relating to individuals, including the obtaining, holding, use or disclosure of such information. Therefore, the type of data obtained and securing data is of paramount importance.
Contraindications
Contraindications are anything (including a symptom or medical condition) that is a reason for a person to not receive a particular treatment or procedure because it may be harmful. For example, having a bleeding disorder is a contraindication for taking aspirin because treatment with aspirin may cause excess bleeding.
While it’s suitable for most people, there are certain reasons that we can’t treat everyone. Before undergoing treatment, clients should always be made aware that certain contraindications can prevent us from proceeding. These include:
(Please note this is not an exhaustive list) - Tinea Corporis (Fungal infection)
- Impetigo (Bacterial infection)
- Herpes Simplex (Viral infection)
- Conjunctivitis (Bacterial eye infection)
- Stye (Bacterial eye infection)
- Blepharitis (Allergic reaction- treatment could make the condition worse)
- Scabies (Infestation of the skin by an animal parasite – infectious)
- Chemotherapy (Usually used for treating cancer – hair/eyelashes will fall out)
The following may restrict the treatment
- Trichotillomania (Hair loss caused by clients repetitive self-pulling of hair)
- Hypersensitive skin (Skin sensitivity – could be on medication that causes skin sensitivity, MUST patch test)
- Epilepsy (Over activity or the brain – some epilepsy is susceptible to bright or strobe lighting
and sometimes strong smells)
- Psoriasis (Mostly hereditary – may be irritated by the treatment)
- Severe asthma (Respiratory problems may be aggravated by chemical fumes given off during the treatment)
- Sebaceous cyst (Often arises from swollen hair follicles or skin trauma – if in the lash area could cause secondary infection)
- Cataracts (Is a clouding of the lens inside the eye which leads to a decrease in vision – lash
extensions may further impair vision)
Clients with contraindications should be encouraged to seek medical advice so the correct treatment can be received.
Specific contraindications should not be named by a therapist when referring clients to a general
practitioner as they are neither trained nor qualified to make medical diagnosis. The consequences of this could be a legal action against the salon or therapist.
Cataract: A cataract is a clouding of the normally clear lens of the eye. For people who have cataracts, seeing through cloudy lenses is a bit like looking through a frosty or fogged-up window. This will not affect the treatment.
Glaucoma: Glaucoma is a group of eye conditions that damage the optic nerve, the health of which is vital for good vision. This damage is often caused by an abnormally high pressure in your eye. Glaucoma is one of the leading causes of blindness for people over the age of 60. This will not affect the treatment.
Psoriasis: Psoriasis is a skin disease that causes red, itchy scaly patches, most commonly on the knees, elbows, trunk and scalp. DO NOT apply lashes to sites that display psoriasis.
Conjunctivitis: Conjunctivitis, also known as pinkeye, is an inflammation of the conjunctiva. The conjunctiva is the thin clear tissue that lies over the white part of the eye and lines the inside of the eyelid.
DO NOT carry out the treatment and refer to GP. Wait 28 days after the infection has cleared before performing treatment to avoid cross infection and any more irritation to client.
Dry eye syndrome: Differs in severity. Drops would be needed for this condition. Lash extensions would not last with the constant use of eye drops.
Trichotillomania: A condition that gives some people strong urges to pull out their own hair. Client may pull out lash extensions which in turn pulls out their
natural lashes.
Stye: A stye is a small, painful lump on or inside the eyelid or around the eye. The skin around the stye may be swollen and red and the stye may be filled with yellow pus. Your eye may be red and watery but your vision should not be affected. DO NOT carry out the treatment as it can cause cross infection.
Blepharitis: Blepharitis causes red, swollen and itchy eyelids. It can normally be treated by washing your eyelids every day. The condition is not usually serious, but can lead to other problems, such as dry eyes, cysts and conjunctivitis, especially if it's not treated. DO NOT carry out the treatment and refer to GP.
Patch Tests
The basic need of a skin sensitivity test is to check the compatibility of the product with the client’s skin. Therefore, discussing allergies and the overall condition of the skin is one way of predicting how the skin will react to the various products used during the treatment; the therapist should not, however, simply guess. A patch test will enable you to ensure that the treatment products will not cause an allergic reaction on the client’s skin and should be carried out at least twenty-four hours before the treatment; the patch test procedure is detailed below:
Patch test step by step:
- Wash hands
- Make sure the client’s eyes are clean and free of makeup and products - Apply eyelash pads – client to close their eyes
- Apply 4/6 eyelash extensions on each eye
These lashes can be left on to fall out naturally or in the events of a reaction advice your client to come and have them removed or severe reactions advise them to seek medical advice immediately.
Alternatively, you can patch test by testing the glue behind the ear or inside of the wrist or elbow. This will need to be covered with a plaster and left on for at least 24 hours.
If there is no reaction to the products within 24/48 hours, then it is safe to carry out the treatment on the client.
An allergic reaction will result in tingling sensation, redness, swelling or severe itching. The results of the patch test should be recorded on the client record forms and the client should confirm they have received it and agree with the results.
Health and Safety
Whether you work from home, a salon or are a mobile therapist you should always strive to provide your clients with the best service; clean, tidy and hygienic environment. You are responsible for the health and safety of yourself, clients and any other people you work with.
The Health and Safety at work Act 1974 law makes sure that the employer has a legal responsibility to provide a healthy and safe environment to work in.
The employer must:
- Provide a safe and healthy workplace
- Correct safety procedures e.g., fire exits
- Safe equipment which is serviced on a regular basis
- Suitable training to all staff in safety procedures - Health and safety policy available to all staff
The employee must:
- Follow health and safety procedures
- Act to protect themselves and others
- Treat all equipment properly and report any faults
Employers and employees must also follow the Control of Substances Hazardous to Health Regulations (COSHH). This regulation assesses the potential risks of substances used in the workplace. Many substances used can be a possible risk to health if they are used and stored
incorrectly.
To comply with COSHH you must:
- Assess the risks
- Decide what safety measures are needed - Store and handle substances correctly - Check and keep track of risks
- Make sure employees are properly informed, trained and supervised where needed
Making sure you are following the industry codes of practice are important to help prevent infections to therapists and clients, prevent offensive odours and portray a professional image to the client. Following these codes of practice will also help prevent and cross infections. Cross infection is the transference of germs through personal contact such as coughing or passing on
germs from using unsterile tools and equipment.
Good hygiene practices are crucial to avoid any cross infection.
These include:
- Using disposable materials wherever possible e.g., couch roll, micro swabs, spoolies.
- Wash down surfaces and floors regularly with disinfectant
- Use yellow bin bags for waste which may contain hair or bodily fluid. These are then collected by the health authority and incinerated.
Sanitation allows for the low-level disinfecting, which may destroy some microorganisms. This basic method of cleaning can be achieved by washing with soap and water. This is the least effective method of preventing the transfer of bacteria.
Disinfection allows for the elimination of most microorganisms. Disinfecting is achieved using chemicals. Using a spray disinfectant or soak is one of the most effective methods to prevent the spread or harmful bacteria. Be sure to use a hospital grade product to ensure a high standard of disinfection.
Sterilization allows for the elimination of all living organisms including viruses (Hepatitis B&C, TB and HIV) bacteria and bacterial spores. Sterilizing requires subjecting your instruments and tools to moist, pressurized heat. Any tools that are used in areas that can enter the layer of the epidermis are required to be sterilized
using either an autoclave or an ultra violet sterilizing unit.
It is important to remember you must sanitise first before disinfecting or sterilizing. Dirty implements cannot be disinfected or sterilized without being sanitised first as the solution of your choice loses its effectiveness as the chemicals in the solution are blinded by the dirt and will not be able to get to the bacteria. To ensure effectiveness
make sure the surface or tools are sanitised first before disinfecting or sterilising.
Anatomy and Physiology
The skin
The skin is the bodies largest organ, covering the entire body and is made up of the following layers, which each layer having specific functions;
- Epidermis
- Dermis
- Subcutaneous fat layer
In addition to serving as a protective layer against heat, light, injury and infection the skins seven functions are:
- Protection
- Heat regulation - Excretion
- Warning
- Sensitivity
- Nutrition
- Moisture control
The skin sends sensory messages through the nervous system, it also regulates heat through sweating and the contracting and relaxing of the arrector pili muscle. Melanin is produced in the skin to provide protection from UV rays however Vitamin D is also produced by the skin when exposed to sunlight.
Skin and hair can vary depending on hereditary conditions, ethnic origin, hormonal changes in the body or external influences such as the environment we live or work in.
The Eyes
The eyeballs, also known as the eye globes are located in two bony sockets (the orbits of the skull). The eyeballs are embedded in orbital fat for their protection. The eye is then covered in the capsule of Tenon, which is a membrane that keeps the eyeball separate from the orbital fat whilst also enabling free movement. Four recti and two oblique muscles are what allows the eyeball to move in different directions. The eye is a complex optical system which collects light from the surrounding environment, which enables us to see. Light penetrates the eye through the Cornea, then travelling through the clear aqueous fluid and through the pupil. The pupil changes size by the muscles in the iris relaxing or tightening, this adjusts the amount of light enabled to enter the eye. Rays of light are then focussed through the lens and continue through the vitreous which gives it shape and form. Once the rays of light land on the retina and upside-down image is formed. The image is changed into an electrical impulse by the retina. This electrical impulse travels along the optic nerve to the brain, this is then where the brain sees the image upright.
The Hair
The eyelashes grow at the edges of the eyelid and protects the eye from dirt or any other potentially harmful object is too close to the eye. Therefore, the eye closes as a protective reaction.
Our body is virtually all covered by hair. The hair is mostly soft and short, known as vellus hair. We also have longer, coarser hair, known as terminal hair. Terminal hair grows thicker where they are needed for protection. Places you will find terminal hair:
- Eyelashes – filter out dust and dirt. Shades the eyes from excessive sunlight
- Eyebrows – protects the eye area and also cushions the brow bone
- Scalp – prevents heat loss from the body and protects against injury to the head - Underarm/pubic area – protects against friction.
Hair that is above the skins surface is mostly made up of keratin. Keratin is a protein which also makes up the skin and nails. The hair follicle is where the hair grows from the skin. At the base of the hair follicle is where the dermal papilla is located. The
dermal papilla is rich with a supply of blood vessels that feed and nourish the hair.
The three stages of the hair growth cycle:
1- Anagen – (infant) - Active growth stage, when the resting follicle ‘wakes up’.
2- Catagen – (teenage) – Changing stage of the hair, where the hair separates from the dermal papilla and the hair follicle degenerates
3- Telogen – (adult) – This is the final stage, known as the resting stage.
There are internal and external influences that can also affect the hair growth:
- Systemic – Condition caused by normal or abnormal hormone changes that stimulates hair growth
- Topical – Used to describe external influences on the body such as, sunburn, waxing etc that stimulates the blood supply to the skin, which in turn stimulates hair growth
- Congenital – Used to describe excess hair growth influenced by race, family ethnic origin etc.
Products and Equipment
- Lamp – Help see the lashes more clearly
- Eye gel pads – to cover bottom lashes
- Primer – effective bonding of the extensions and removes natural oils from the eyelashes
- Lash adhesive – glue used to apply extensions to natural lashes - Lash extensions – Available in all colours and lengths
- De-bonder/Remover – to remove one or more lash extensions
- Micropore tape – to secure the gel pads if needed
- Tweezers – To separate and apply lashes
- Glue ring/Jade stone – to hold the glue
- Eyelash brush/spoolie – for combing the lashes during and after treatment
Between clients, tweezers should be sterilised in Barbicide, a UV cabinet or another sterilisation method. Tweezers should be wiped with surgical spirit to ensure they are free of grease and dirt.
Demodex folliculorum, or demodicid is a tiny mite (sometimes called a face mite) that lives in the pores and hair follicles. They are often in the roots of the eyelash’s as found in most adults. Demodex are mostly harmless and don’t usually transmit any diseases, but large numbers may cause itching, skin disorders, inflammation, infection and can cause the lashes to fall out easily. It is essential that sterile equipment be used to prevent any mite transfer.
Storage of adhesive
Lash adhesives have a shelf life of approximately 6-9 months from the time of production and 3 months from the time the container is opened. Keeping your adhesive in good condition is essential otherwise the bonding to the natural hair will be weakened. Here are a few basic rules you need to follow:
• Shake the bottle well before use.
• Wipe away any remaining adhesive around the nozzle and cap before closing. • Keep the container tightly closed when not in use.
• Avoid storing or exposing the lash adhesive to direct sunlight and heat.
• Lash adhesive is moisture and temperature sensitive, so you can store it at room temperature or refrigerate (no less than 55 degrees Fahrenheit) to help extend the shelf life of the adhesive. Take care when moving the lash adhesive from very cold to a very hot environment, as condensation will form which will negatively impact on the bonding quality of the product. After refrigeration, allow 2 hours at room temperature before using.
What eyelashes shall I use?
Choosing the correct lash extensions will ensure that your client gets the best result from their treatment. Talk to your client about the look they would like to achieve. Make sure you’re taking into consideration the current state of their natural lashes and explaining this to your client when deciding on the final look. Consider the
length, curl and thickness of the lash extensions.
Eye Shapes
- Almond Eyes – short lashes should be applied inner eye, medium lashes middle of eye, longer lashes towards outer edge of eye.
- Deep Set Eyes – all lashes should be the same length – use longer length lashes.
- Round/Protruding Eyes – short lashes should be used with some longer ones on outer edge of eye.
Natural lashes
- Fine natural lashes – apply equally fine lash extensions to avoid over-weighing the natural lash.
- Strong lashes – this lash type will support any weight of lash – fine, thick and extra thick.
- Naturally very curled – a shorter lash extension should be used to provide the maximum bonding area.
Application Procedure
1. Place the client in a semi reclined position; Use a lash shampoo to remove any impurities that may prevent the lash extensions from adhering to the natural lashes. It is a good idea to ask clients not to wear face/eye creams, makeup/mascara on the day of
their appointment for the best results.
2. Cover lower lashes with gel pad. Micro-pore tape can be applied to edge of gel pad, to help prevent movement of the pad.
3. Select the individual lashes required – use lashes that are between half and a third longer than the client’s natural lashes.
4. Comb the client’s lashes to separate.
5. squeeze a small amount of glue into the glue ring and place it on your thumb. Or if you are using the jade stone, place a small piece of tape on to the jade stone (this is prevent staining and for easy removal of excess glue). Squeeze a small amount of adhesive onto the tape.
6. Using pointed tweezers, weave a layer of lashes and secure back onto the eyelid using micropore tape. This will expose a layer of shorter lashes for you to work on.
7. Isolate the natural lash using tweezers. Pick up the lash to be applied at its polished tip.
8. Dip end of the lash base into the adhesive, coating evenly.
9. Stroke the natural lash with the adhesive on the false lash, then place the lash on top of the natural lash leaving a distance of 0.5-1mm from the natural lash root. Do not attach the lash to the root of the eyelash or to the eyelid as this may cause discomfort or irritation and the lash may fall off. Ensure the lash is curling straight up before the adhesive has dried.
10. The client must keep her eyes closed for a few minutes after lash application to avoid unnecessary lash movement and to allow the adhesive to dry completely. You can use a hand fan/lash fan to help speed this process up.
11. Remove gel pad from lower lashes.
12. Give client aftercare advice.
Perfect Bonding Tips
• Advise client not to open eyes during treatment and to try to lay as still as possible – you will be working with sharp tweezers around the eye area.
• Check the lower lashes are completely covered.
• Hold lash and tweezers at 45-degree angle.
• Do not apply lash to skin, apply 0.5 – 1mm away from base of lash.
• Push all lashes aside, isolating one lash completely.
• Adhere lash curl side up, wait for a few seconds for adhesive to bond and ensure curl is in an upward position.
• Ensure lashes are not sticking together by using gentle sweeping strokes towards the tips with an eyelash comb avoiding the base of the bond area – if lashes are sticking use remover or gently peel apart.
Aftercare, Maintenance and Removal
Aftercare
Aftercare advice is important to ensure the client does not use any products, or any detrimental activities that could cause a contraindication. To help the client get the most from her treatment, products and professional homecare advice should be recommended.
1. For the first 24 hours after the application of lash extensions, do not allow water to come into contact with the lashes. However, a lash sealant can be applied to help with bonding.
2. For two days after the treatment do not steam face, use a steam bath, swim or wash face with hot water.
3. Do not use mascara on the lash extensions.
4. Do not perm lash extensions or use a lash curler as it could break the lash bond.
5. Do not tint the lashes – if the client requires tint this should be performed prior to the application of lash extensions.
6. Do not rub eyes or lashes when washing the face. Always pat dry lashes after cleansing.
7. Eye creams or any product containing oil will loosen the lash adhesive and cause the lash extension to prematurely fall out.
8. Approximately 80-100 lashes will be applied, so it is normal to lose a few lashes during the first 24 hours after the application.
9. The client should return for maintenance every 2-3 weeks.
10. If the client looks after the eye lashes well and attends maintenance appointments the lashes will last up to 8 weeks. After 8 weeks they should be removed and after a short rest a new set can be re-applied.
Maintenance
Eyelashes grow on a continuous cycle of replenishment - the average life cycle of the natural lash is approximately 90 days.
Lashes are shed on a daily basis so a client should attend for maintenance of lashes every 2-3 weeks.
Week 1 – lashes should look good for the first 10-14 days without need of maintenance Week 2 – lashes will start to look less full as your natural lash cycle begins to shed. This is the time when a 15–30-minute session is required.
Week 3 – If the lashes have not been maintained the lashes will start to look more sparce.
Week 4 – If no maintenance has been performed, the eyelash extensions will be almost gone.
Removal
1. Place the client in a semi reclined position and place gel pads over the lower lashes. Place a couple of drops of lash remover in the cap of the container (this can be a liquid or cream remover)
2. Take two micro brushes and dip them into the remover.
3. Using both micro brushes slowly stroke the lashes with solvent remover by stroking the lashes from root to points carefully with micro-brushes soaked in solvent to ease the lashes off individually, ensuring that the solvent doesn’t enter the eye.
4. After a few seconds the bond will loosen and the lash extension will slide off the natural lash.
5. Use a lash shampoo to cleanse the lashes after removal, followed by a damp cotton pad to remove any shampoo.
In the unlikely event that anything should enter the client’s eye a sterile eyewash should be used for effective removal.
Case Studies
You will now need to complete 3 case studies. Please send before and after pictures and one close up video of your client’s eyelashes.
Also attach the following:
• What lashes did you use?
• How did the client react to the results? • What was good about the results?
• What can you improve on in the future?
Student Ratings & Reviews
